构建您自己的上下文提供程序
Continue 提供了几种向扩展程序提供自定义上下文的方法。
HTTP 上下文提供程序
Continue 可以从您创建和部署的自定义 HTTP 服务器检索上下文。像这样将 @HTTP 上下文提供程序添加到您的配置中
- YAML
- JSON
context:
  provider: http
  params:
    url: https://myserver.com/context-provider
    title: http
    displayTitle: My Custom Context
    description: Gets things from my private list
    options:
      maxItems: 20
{
  "name": "http",
  "params": {
    "url": "https://myserver.com/context-provider",
    "title": "http",
    "description": "Custom HTTP Context Provider",
    "displayTitle": "My Custom Context",
    "options": {
      "maxItems": 20
    }
  }
}
然后,创建一个服务器来响应来自 HttpContextProvider.ts 的请求。请参阅 context_provider_server.py 中的 hello 端点,了解使用 FastAPI 的示例。
"options" 属性可用于向您的端点发送附加参数。完整的请求体具有以下形状
{
  query: string;
  fullInput: string;
  options: Record<string, JsonValue>;

  workspacePath?: string; // Only provided if the server is local.
}
使用 CustomContextProvider
自定义上下文提供程序可以在放置在您的 Continue 全局目录中(~/.continue 用于 MacOS,%USERPROFILE%/.continue 用于 Windows)的 config.ts 文件中实现。您可以在 config.ts 中实现 CustomContextProvider 接口
interface CustomContextProvider {
  title: string;
  displayTitle?: string;
  description?: string;
  renderInlineAs?: string;
  type?: ContextProviderType;
  getContextItems(
    query: string,
    extras: ContextProviderExtras,
  ): Promise<ContextItem[]>;
  loadSubmenuItems?: (
    args: LoadSubmenuItemsArgs,
  ) => Promise<ContextSubmenuItem[]>;
}
举例来说,假设您有一组内部文档,这些文档已在向量数据库中进行了索引。您已经设置了一个简单的 REST API,允许内部用户查询并获取相关的代码片段。这个上下文提供程序将把查询发送到这个服务器,并返回向量数据库中的结果。getContextItems 的返回类型*必须*是一个包含以下所有属性的对象数组
name: 上下文项的名称,将显示为标题description: 上下文项的更长描述content: 上下文项的实际内容,将作为上下文馈送给 LLM
const RagContextProvider: CustomContextProvider = {
  title: "rag",
  displayTitle: "RAG",
  description:
    "Retrieve snippets from our vector database of internal documents",

  getContextItems: async (
    query: string,
    extras: ContextProviderExtras,
  ): Promise<ContextItem[]> => {
    const response = await fetch("https://internal_rag_server.com/retrieve", {
      method: "POST",
      body: JSON.stringify({ query }),
    });

    const results = await response.json();

    return results.map((result) => ({
      name: result.title,
      description: result.title,
      content: result.contents,
    }));
  },
};
然后可以在 config.ts 中这样添加
export function modifyConfig(config: Config): Config {
  if (!config.contextProviders) {
    config.contextProviders = [];
  }
  config.contextProviders.push(RagContextProvider);
  return config;
}
这将自动附加到您的配置中。
带有子菜单或查询的自定义上下文提供程序
上下文提供程序有 3 种类型:"normal"、"query" 和 "submenu"。"normal" 类型是默认类型,也是我们目前看到的。
当您想要向用户显示一个文本框,然后使用该文本框的内容来生成上下文项时,可以使用 "query" 类型。内置示例包括 "search" 和 "google"。这段文本就是传递给 getContextItems 函数中 "query" 参数的内容。要实现 "query" 上下文提供程序,只需在您的自定义上下文提供程序对象中设置 "type": "query"。
当您想要在下拉列表中显示一个可搜索的项目列表时,可以使用 "submenu" 类型。内置示例包括 "issue" 和 "folder"。要实现 "submenu" 上下文提供程序,请设置 "type": "submenu" 并实现 loadSubmenuItems 和 getContextItems 函数。下面是一个示例,显示当前工作区中所有 README 文件列表
const ReadMeContextProvider: CustomContextProvider = {
  title: "readme",
  displayTitle: "README",
  description: "Reference README.md files in your workspace",
  type: "submenu",

  getContextItems: async (
    query: string,
    extras: ContextProviderExtras,
  ): Promise<ContextItem[]> => {
    // 'query' is the filepath of the README selected from the dropdown
    const content = await extras.ide.readFile(query);
    return [
      {
        name: getFolder(query),
        description: getFolderAndBasename(query),
        content,
      },
    ];
  },

  loadSubmenuItems: async (
    args: LoadSubmenuItemsArgs,
  ): Promise<ContextSubmenuItem[]> => {
    const { ide } = args;

    // Filter all workspace files for READMEs
    const workspaceDirs = await ide.getWorkspaceDirs();

    const allFiles = await Promise.all(
      workspaceDirs.map((dir) =>
        ide.subprocess(`find ${dir} -name "README.md"`),
      ),
    );

    // 'readmes' now contains an array of file paths for each README.md file found in the workspace,
    // excluding those in 'node_modules'
    const readmes = allFiles
      .flatMap((mds) => mds[0].split("\n"))
      .filter((file) => file.trim() !== "" && !file.includes("/node_modules/"));

    // Return the items that will be shown in the dropdown
    return readmes.map((filepath) => {
      return {
        id: filepath,
        title: getFolder(filepath),
        description: getFolderAndBasename(filepath),
      };
    });
  },
};

export function modifyConfig(config: Config): Config {
  if (!config.contextProviders) {
    config.contextProviders = [];
  }
  config.contextProviders.push(ReadMeContextProvider);
  return config;
}

function getFolder(path: string): string {
  return path.split(/[\/\\]/g).slice(-2)[0];
}

function getFolderAndBasename(path: string): string {
  return path
    .split(/[\/\\]/g)
    .slice(-2)
    .join("/");
}
上面示例中的信息流如下所示
- 用户输入
@readme并从下拉列表中选择它,现在显示子菜单,他们可以在其中搜索由loadSubmenuItems返回的任何项目。 - 用户在子菜单中选择一个 README,输入其余内容,然后按 Enter。
- 所选
ContextSubmenuItem的id作为query参数传递给getContextItems。在这种情况下,它是 README 的文件路径。 - 然后,
getContextItems函数可以使用query来检索 README 的完整内容,并在返回将包含在提示中的上下文项之前格式化内容。
导入外部模块
要在 config.ts 中包含外部 Node 模块,请从 ~/.continue 目录运行 npm install <module_name>,然后在 config.ts 中导入它们。
Continue 将使用 esbuild 将您的 config.ts 和所有依赖项打包到单个 Javascript 文件中。使用的确切配置可以在此处找到。
CustomContextProvider 参考
title: 上下文提供程序的标识符displayTitle(可选): 在下拉列表中显示的标题description(可选): 鼠标悬停时在下拉列表中显示的更长描述type(可选): 上下文提供程序的类型。选项包括 "normal"、"query" 和 "submenu"。默认为 "normal"。renderInlineAs(可选): 将在提示顶部内联渲染的字符串。如果未提供值,将使用displayTitle。可以提供空字符串以防止渲染默认的displayTitle。getContextItems: 一个函数,返回要包含在提示中的文档。它应该返回一个ContextItem列表,并可以访问以下参数extras.fullInput: 一个字符串,表示用户在文本框中的完整输入。例如,这可以用于生成嵌入向量,以便与一组其他嵌入文档进行比较extras.embeddingsProvider: 嵌入提供程序有一个embed函数,可以将文本(例如fullInput)转换为嵌入向量extras.llm: 当前的默认 LLM,您可以使用它进行完成请求extras.ide:IDE类的一个实例,允许您从 IDE 中收集各种信息源,包括终端内容、打开文件列表或当前打开文件中的任何警告。query: (当前未使用) 表示查询的字符串
loadSubmenuItems(可选): 一个函数,返回要在子菜单中显示的ContextSubmenuItem列表。它可以访问一个IDE实例,与传递给getContextItems的相同。 .
VSCode 的扩展 API
Continue 暴露了一个 API,用于从第三方 VSCode 扩展程序注册上下文提供程序。如果您有一个 VSCode 扩展程序提供了一些您希望在 Continue 中使用的附加上下文,这将非常有用。要使用此 API,请将以下内容添加到您的 package.json
{
  "extensionDependencies": ["continue.continue"]
}
或者从 npm 安装 Continue Core 模块
npm i @continuedev/core
您可以在 package.json 中将 Continue core 模块添加为开发依赖项
{
  "devDependencies": {
    "@continuedev/core": "^0.0.1"
  }
}
然后,您可以使用 registerCustomContextProvider 函数注册您的上下文提供程序。您的自定义上下文提供程序必须实现 IContextProvider 接口。这是一个示例
import * as vscode from "vscode";
import {
IContextProvider,
ContextProviderDescription,
ContextProviderExtras,
ContextItem,
LoadSubmenuItemsArgs,
ContextSubmenuItem,
} from "@continuedev/core";
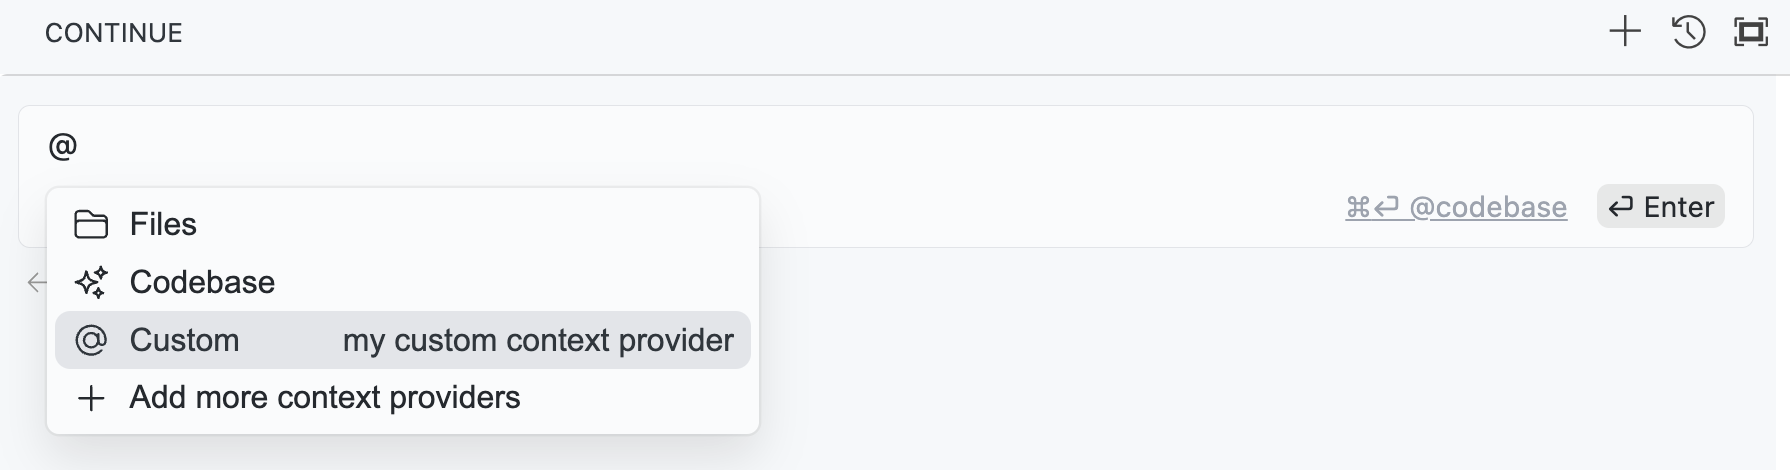
class MyCustomProvider implements IContextProvider {
get description(): ContextProviderDescription {
return {
title: "Custom",
displayTitle: "Custom",
description: "my custom context provider",
type: "normal",
};
}
async getContextItems(
query: string,
extras: ContextProviderExtras,
): Promise<ContextItem[]> {
return [
{
name: "Custom",
description: "Custom description",
content: "Custom content",
},
];
}
async loadSubmenuItems(
args: LoadSubmenuItemsArgs,
): Promise<ContextSubmenuItem[]> {
return [];
}
}
// create an instance of your custom provider
const customProvider = new MyCustomProvider();
// get Continue extension using vscode API
const continueExt = vscode.extensions.getExtension("Continue.continue");
// get the API from the extension
const continueApi = continueExt?.exports;
// register your custom provider
continueApi?.registerCustomContextProvider(customProvider);
这将向 Continue 注册 MyCustomProvider!